Thursday, October 2, 2014

Bridesmaids......

Hi again everyone... lovely to have the sun extended here for another while, I hope the sun is shining where you are today!  Well recently I had a request for some cards for 3 lovely Bridesmaids, some thankyou cards for all they do for the Bride.  Its a bit more special to say thankyou with some handmade cards, with the input from the Bride....Theme: Aubergine, Lace and Pearls - its the thought that counts and its nice to be able to put it on paper/card :)

Heres what we came up with.....


Hope you like them.  Thanks for stopping by, love hearing from you all. TTFN  :)


Tuesday, September 2, 2014

Back to school....

Hey everyone, yes I'm still alive.... I can't believe its been that long.  When I look at the date of the last post I suddenly realise why...."School Holidays".  Its been a very busy holiday alright and now its back to routine and actually getting things done. Hope all your little ones have enjoyed heading back to school and routine. (Mammys probably enjoy it more!!)  I know some are a bit shy or nervous starting school and some of my friends kids starting secondary school.  But by the sounds of it settling in grand. 

Here's a card I finished recently, with a gorgeous "Bella" on the front. :)

#894 on my Facebook Page - Marianne's Handmade Cards

#894 on my Facebook Page - Marianne's Handmade Cards

Monday, June 30, 2014

Vintage Crinkle Ribbon...

Hi Everyone, hope your day is going well, thanks for stoppin by my blog.  I love when you get a chance to leave a comment, helps me realise that you are out there.  Today I have some photos of some Vintage crinkle ribbon I made.  Its not sold in many places and when I found a whole reel of Vintage Ribbon in Cream I just had to have it, to have a go making my own Crinkles and Colours!!
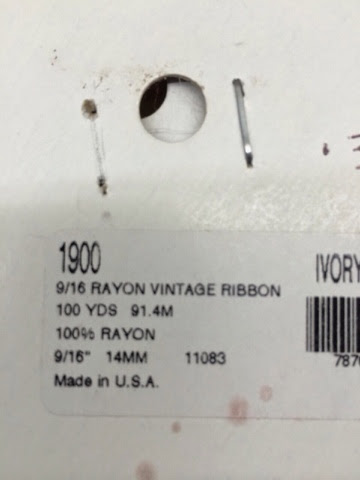
 If you wanna give it a go this is the ribbon you'll be looking for. Let me know too if you find it as I'd be interested in getting some more. I got this one in a shop in Kilkenny, but it was the last one and I haven't seen it since. 
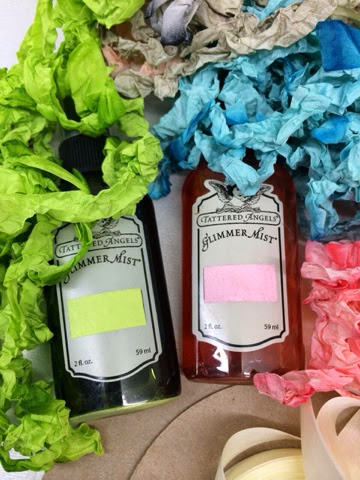
Anyway the first thing you need to do is spray your ribbon with some water first just to dampen it then use your coloured mists or sprays, scrunch the colour in as you go.  When your happy with it scrunch it into a ball - love that word SCRUNCH! Ha ha.  Put elastic bands around it to keep it  scrunched!! Leave them over night. 
 I wanted a darker pink too so I used Ranger Distress Ink, rubbed some on my craft sheet and sprayed with water and cleaned it up with my ribbon, fab colour and worked just as well as the sprays. 
When you've left the ribbon in the elastics overnight, take the elastics off and unravel your ribbon, they will be still damp, so let them air dry, doesn't take long. 

And you have beautiful Vintage Ribbon in the colours of your choice for your crafty projects! Hope you try it out - let me know if you do, I'd love to see what you all come up with or what you use it on. Oh and don't forget to let me know if you see the Rayon Vintage Ribbon somewhere! Thanks for stopping by......... Until the next time!
 P.S. Thanks Nics for the info I needed to Blog from my IPad, sooooooooo much easier!! Xxx

Friday, June 27, 2014

Altered Graphic 45 Match Box

 Hey Girls, (haven't seen any fellas here on my blog yet so I think I'm safe enough just welcoming the girls, but guys yer more than welcome if ye happen to pop in too, ha ha ) thanks for poppin in to see me, I love hearing from you all. Here's another project for you to follow along and maybe give it a go.  These Match Boxes from Graphic 45 are great to alter and you can use them to hold anything you can think of really.  I think I might make a mini album to fit into this one - so watch this space.  I got my Match Box from Cardz n Scrapz, here's the link if you'd like to have a go Graphic 45 Match box

I forgot to take a photo of the Match Box before I started but you'll get the idea from the link above.  First of all I painted my box with Perfect pearls Mists from Ranger, making sure it was uneven and blotchy. :)


 Then I measured and cut some paper pieces from Graphic 45 - Botanical Tea paper pad.  I inked the edges with Ranger Distress Ink - Vintage Photo. Then I put some score tape on the back and stuck them on the box.


I then used one of the Graphic 45 Antique Metal Door Pull and attached it to one end to make it easier to open the drawer.  You can also get these in Cardz n Scrapz here Graphic 45 Antique Metal Door Pull  


I also put some metal corners on and lace that I had in my stash, see pics below.

I added some flowers, pearls etc. and some of my special handmade "Crinkle Ribbon" and at last I finished it - heres a look at the finished product!!  Hope you give it a go, would love to see what you all come up with. Talk soon. xx


Til next time xXx

Monday, June 23, 2014

Vintage Baby Card - London has a new Baby!

Hi Everyone, hope your all keeping well!

A friend of mine has had a new niece, she couldn't help where she was born. I'm sure London is a fine a place as any to be born! :D  What a beautiful name tho "Amelie".  She's so cute too.  She wanted to send a special card and I got the job...........delira to make up a special card for a special little girl.  Heres what I came up with............

Heres a nice vew of my Handmade Crinkle Ribbon, with a little Rocking Horse

I used Olivia paper from BasicGrey, lace, feathers, gems etc.

Hope you like it, let me know with a comment below. :) xx

Monday, May 26, 2014

On Your Engagement.........

Another 6 x 6 inch box card with lovely lace, flowers n ribbons.
Hope your Engagement went well Kieran & Sheena. 


Beautiful Box

Box with Card inside

Handcrafted Vintage Card


Handcrafted Box to match Card


Thursday, May 1, 2014

Looking back........

Looking back...........in time, ......it flys by and photos help us to remember!! Or if you weren't there, to see what life was like in the good ole days.  46 years ago these kids got married, I don't know who let them but there ya go!  Fun times to remember and celebrate.....Happy Anniversary Mom n Dad!!


Oh yeah and here's more of my Crinkle Ribbon!!

Thursday, April 24, 2014

Live, Love, Laugh...............

Hey big HELLO to you all this eve, I can see Friday around the corner!! Well I got to squeeze in some me time this eve......you have to LIVE, don't you!! I have a LOVE for craftiness as you all know, so I added one of those and finished off with a LAUGH!! Hee hee  I still need to get these on my wall in my Craft Loft, but I thought I'd take some photos before I did.  I'll treat ye to some photos when I get them on the wall too. Can't promise you won't be waiting long, but I really hope not, I can't wait to see them on the wall myself!!

I used Graphic 45's paper from their 8x8 Botanical Tea - absolutely fab paper!! The words started off as just MDF words. I cut the letters out from the paper and used Vintage Photo Distress Ink on the edges, then glued them on to the MDF words. The stencil for the little modelling paste flowers is from Prima, I just put a little gem in the center of each flower to make them stand out a little more. Fussy cut out lots from the pad to add more dimension and added distress ink and some stickles.  Hope you like what I've done.  Enjoy the photos and let me know what you think, thanks gals, till next time. ;)
I put gesso on then covered the words with Graphic 45 paper


Adding the flowers with Modelling paste and a stencil from Prima


Live - I added some of my Crinkle Ribbon

Live


Love

Love
Love - (extra pic of Love - we can always do with a bit more Love!)
Laugh - I know these are self explanatory, but just incase I forget! Ha ha


Laugh - with a little charm from my favourite perfume!!


Ok Live, Laugh & Love!!


Monday, March 24, 2014

Vintage Wedding Card

Boxed Card

 Here is a beautiful 6x6 inch boxed wedding card.  I used KaiserCraft - These Days paper pad, I inked the edges with Ranger Distress Ink - Vintage Photo and used the Tim Holtz distress tool too. Stitched around the edges with my sewing machine (this machine sees alot more paper and lace than it sees material)!!  I used a Hero Arts swirl stamp and embossed with silver WOW! embossing powder for the background and added some pearls on the ends of the swirls. I added lace, pearls, cheesecloth and feathers to build it up. I then cut out some white card with Stampin Up! Framelits labels collection, Inked again with Ranger Vintage Photo and used my black gel pen to add faux stitching, I sprayed the labels with Rangers Perfect Pearls Mists - Heirloom Gold.  I found a fab Vintage Bird on Graphics Fairy and fussy cut it out, inked it also and sprayed with the Perfect Pearls and added stickles to the neck of the bird and on the rose. Added the ribbon and twine with tags and some stickles.  On the box I added a metal leaf attached to the ribbon. On the box I used Versamark Ink to stamp some hearts from the Potpourri Stampin Up! stamps. I put some Stampn Up! heat n stick on and then added glitter. Took some photos and packed it up nice n snug to be posted!! Please Mr. Postie be gentle with it!! :D